This guide walks you through formatting your first document with Reformat, from start to finish.
Before You Start
You will need:
- Microsoft Word (desktop) with the Reformat add-in installed.
- A document open in Word that you want to format.
- At least 1 credit (new users get 1 free credit on signup).
Step 1: Open the Add-in
Open your document in Microsoft Word, then open the Reformat add-in from the ribbon. The Reformat panel will appear on the right side of your Word window.
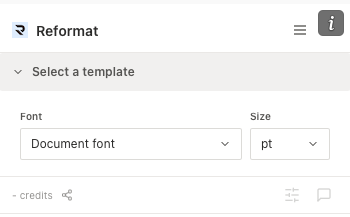
Step 2: Choose a Font (Optional)
Below the template list you will see two dropdowns:
- Font — leave this as “Document font” to keep your existing font, or select a specific font to override the entire document.
- Size — leave this as “pt” to keep your existing sizes, or select a specific point size.
These are optional. Most users leave them at their defaults.
Step 3: Apply a Template
Each template in the list has its own Apply button. Click the template name to expand it and see a preview, then click Apply to start formatting. Templates define the formatting rules for your document — headings, spacing, numbering, margins, and more.
If your organisation has uploaded custom templates, they will appear in the list alongside the built-in options.
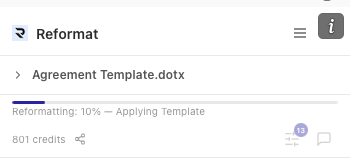
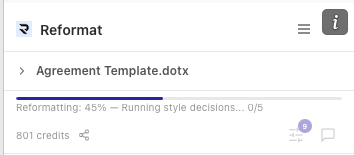
One credit is deducted when you click Apply. The template section collapses and a progress bar appears showing the current percentage and phase (e.g. “Applying Template”, “Running style decisions…”).
If an error occurs during processing, your credit is automatically refunded.
Step 4: Review the Results
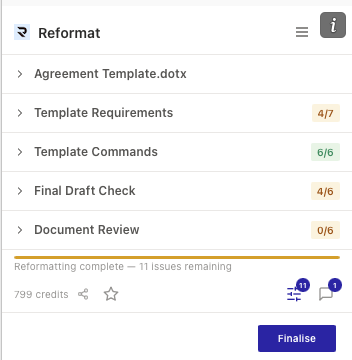
When formatting finishes, the progress bar will show a completion message like “Reformatting complete — 11 issues remaining”.
At this point your document has been formatted. You will notice content control borders — thin outlines around paragraphs in your document. These borders show which paragraphs Reformat has processed and what style was applied.
The Advanced Panel
Tap the Advanced button (sliders icon with the issue count badge) in the footer to see a detailed breakdown:
- Template Requirements — document-level items like headers, footers, page numbers, and watermarks. Unmet requirements show a refresh icon; you can resolve them manually and tick the checkbox, or tap Resolve all to mark them complete.
- Template Commands — the formatting commands that ran on your document. Expand any command to see how many paragraphs it affected. Click inside a content control border in the document to see its assigned style and change it if needed.
- Final Draft Check — additional quality checks (available on Monthly and Annual plans). Expand individual checks to see specific issues, dismiss them, or resolve them.
- Document Review — grouped suggestions about formatting decisions. Each suggestion shows a description, paragraph excerpt, and recommended style. You can accept, dismiss, or change the suggested style.
The Review Chat
Tap the Review button (chat icon) in the footer to open the Review Chat. Here you can ask questions about why a paragraph was formatted a certain way, or request specific changes. Select text in your document first to give the chat context about what you are asking about.
Step 5: Finalise
Once you are satisfied with the results, tap the blue Finalise button at the bottom of the panel.
If there are unresolved issues, Reformat will show a confirmation listing what remains (e.g. “3 template requirements unmet”, “5 style inconsistencies found”). You can choose Review Issues to go back and address them, or Finalise Anyway to complete the process.
Finalising removes all content control borders from the document, cleans up internal data, and reloads the add-in. Your document is now fully formatted and ready.
Leave Feedback (Optional)
At any point after formatting completes, you can tap the star icon (☆) in the footer to open the feedback form. Rate the results, share what worked and what did not, and select a document category. This helps us improve Reformat for everyone. Feedback is completely independent from finalising — you can submit it before or after you finalise.
Summary
- Open your document and the Reformat add-in.
- Optionally choose a font and size.
- Click Apply on the template you want.
- Review results in the Advanced panel and Review Chat.
- Finalise to remove content control borders and complete the process.