The Reformat add-in lives in a side panel inside Microsoft Word. This guide walks through every part of the interface so you know where everything is before you start formatting.
The Header
At the top of the panel you will see:
- Reformat logo and title on the left.
- Menu button (☰) on the right — opens the main menu. A badge appears when you have unread announcements or pending team invitations.
The Main Menu
The menu is divided into sections:
Account
- Your Profile — opens your profile page on the Reformat website.
- Your Team — opens team management. A red dot appears if you have pending team invitations.
- Your Plan — view your current plan and credit balance.
- Referral Credits — manage and track your referrals.
Workspace
- Demo — try an interactive guided demo without using credits.
- How it Works? — a quick overview of Reformat on the website.
- What’s New — product announcements. A badge appears when there are unread updates.
- Plans — compare and purchase subscription plans.
- Reformat on Web — open the browser-based version of Reformat.
- Template Editor — create and configure custom templates.
- Help & Information — opens the community knowledge base.
- Support — open a new support request.
- Community — browse the Reformat community forum.
Log Out — signs you out of the add-in.
Template and Font
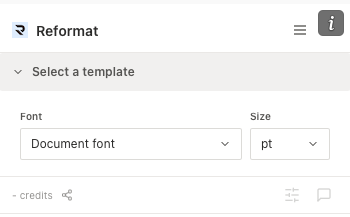
Below the header is the Select a template section. It lists all templates available to your organisation. Each template has its own Apply button — click the template name to expand it and see a Preview option.
Below the template list are two optional dropdowns:
- Font — defaults to “Document font” (keeps whatever font your document already uses). Select a specific font to override the entire document after formatting.
- Size — defaults to “pt” (keeps the existing size). Select a specific point size to override the document’s font size globally.
Choose your font and size preferences first, then click Apply on the template you want. The section collapses once formatting begins and shows the applied template name.
The Progress Bar
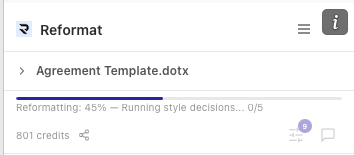
When you apply a template, a progress bar appears between the template section and the footer. It shows:
- A percentage and a phase label during formatting, for example: “Reformatting: 45% — Running style decisions… 0/5”.
- A completion message once formatting finishes, for example: “Reformatting complete — 11 issues remaining”.
The progress bar colour changes depending on the outcome:
- Blue while formatting is in progress.
- Green if everything completes with no remaining issues.
- Amber if there are remaining issues for you to review.
The Footer
The footer is pinned at the bottom of the panel. From left to right:
- Credits display — shows your current credit balance (e.g. “799 credits”). Clicking it opens a panel where you can view your balance and send referral invitations.
- Share icon — also opens the referral panel.
- Feedback button (star icon ☆) — appears after formatting completes. Opens an independent feedback form where you can rate the formatting results. This is separate from the Finalise button.
- Advanced button (sliders icon) — opens the Advanced panel. A badge shows the total number of unresolved issues across all sections.
- Review button (chat icon) — opens the Review Chat. A badge shows when suggestions are available.
The Advanced Panel
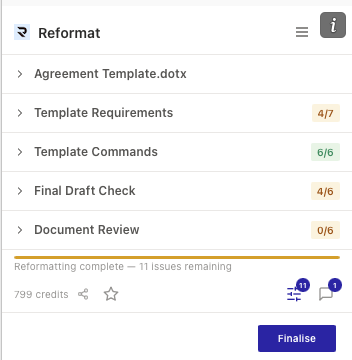
Tapping the Advanced button in the footer reveals four collapsible sections:
- Template Requirements — document-level checks (headers, footers, page numbers, etc.). Shows a progress badge like “4/7”.
- Template Commands — the formatting commands that were applied to your document. Shows a progress badge like “6/6”.
- Final Draft Check — additional quality checks for style inconsistencies, placeholder text, and more. Available on Monthly and Annual plans only. Shows a progress badge like “4/6”.
- Document Review — grouped suggestions about formatting decisions that may need your attention. Shows a progress badge like “0/6”.
Each section has its own progress badge. Orange means there are items remaining; green means everything is resolved. Sections auto-collapse once all their items are resolved.
The Review Chat

Tapping the Review button in the footer opens a full-screen chat panel. At the top is a back arrow (←) to return to the main view.
The chat is an interactive conversation where you can ask questions about the formatting, request specific changes, and discuss suggestions. You can select text in your Word document before sending a message, and the selected text will appear as a context chip above the input field.
When the chat proposes changes to your document, you will see a summary of pending changes with Apply and Reject buttons, giving you full control before anything is modified.
The Finalise Button
Once formatting is complete, a blue Finalise button appears at the very bottom of the panel. Tapping it:
- Removes all content control borders from the document.
- Cleans up internal formatting data.
- Reloads the add-in to its initial state.
If there are unresolved issues, tapping Finalise will show a confirmation listing the remaining issues. You can choose Review Issues to go back, or Finalise Anyway to proceed.
Finalise and Feedback are separate actions. The feedback form (star icon in the footer) can be submitted at any time after formatting completes, independently of finalising.
The Web Dashboard
Access at https://web.reformatword.com after signing in.
Navigation Sidebar
- Profile — personal information and settings
- General — “How it Works” guide and FAQ
- Team — manage members and workspace settings
- Your Plan — credit balance, usage, billing (Admin only)
- Plans — view and purchase credit plans
- Templates — template options and custom services
- What’s New — product updates and announcements
- Billing — Stripe customer portal for subscriptions
- Library — browse and manage templates
- Referral Credits — referral program dashboard
Navigation Tips
For New Users
- Apply a template and watch the progress bar
- Switch to the Advanced panel to review and resolve any flagged items
- Use the Review chat if you’re unsure about a formatting decision
For Team Admins
- Use Team for member management on the web dashboard
- Monitor usage in Your Plan
- Configure company domain for easy team onboarding