Custom templates let you define your organization’s specific formatting rules. This guide walks you through creating templates using the free Template Editor step by step.
Template Creation Options
Option 1: Free Template Editor
Create templates yourself using our visual editing tools. This option is:
-
Free - No additional cost
-
Unlimited - Create as many templates as you need
-
Visual - No coding or technical knowledge required
Option 2: Professional Custom Template Service
Have our expert team build templates for you with advanced automation and brand controls.
Using the Free Template Editor
Step 1: Access the Template Editor
-
Log in to web.reformatword.com
-
Go to Templates in the sidebar
-
Click Create New Template under “Free Template Editor”
The Template Editor opens with the Base Template loaded.
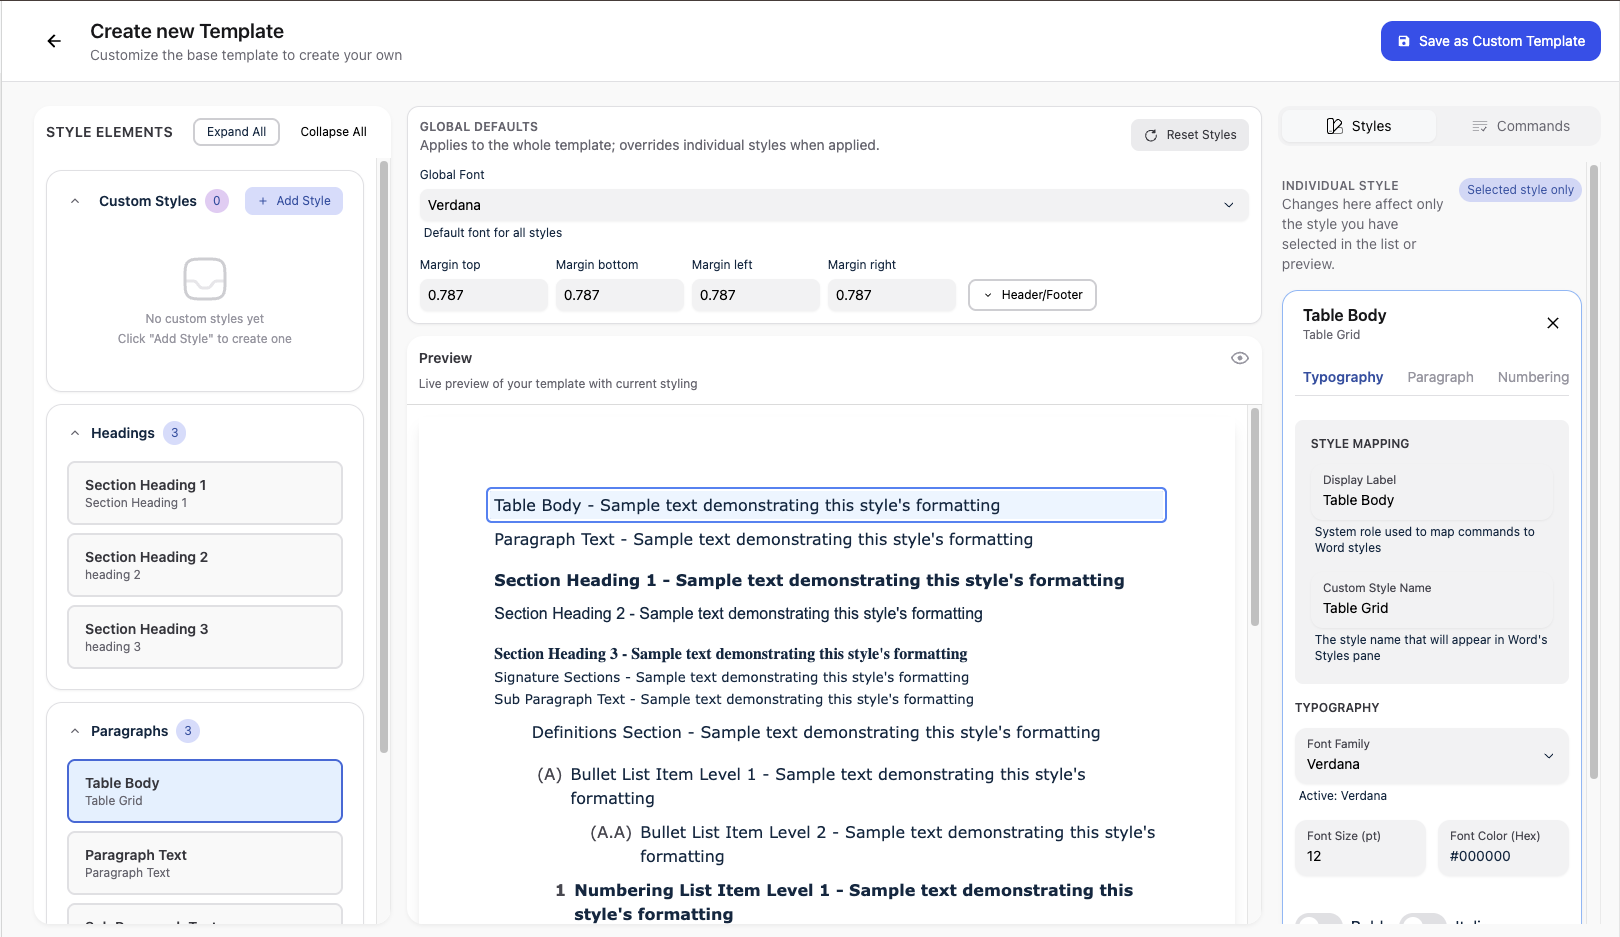
Step 2: Understand the Editor Layout
The Template Editor has three main panels:
Left Panel - Style List
Shows all available styles in your template. Click any style to select it for editing.
Center Panel - Preview
Shows a live preview of how your template will look. Changes appear here as you edit.
Right Panel - Style Editor
Where you customize the selected style’s properties.
Editing Styles
Selecting a Style
-
Look at the Style List on the left
-
Click on any style name (e.g., “Heading 1”, “Body Text”, “Numbered List Level 1”)
-
The style becomes highlighted and its settings appear in the right panel
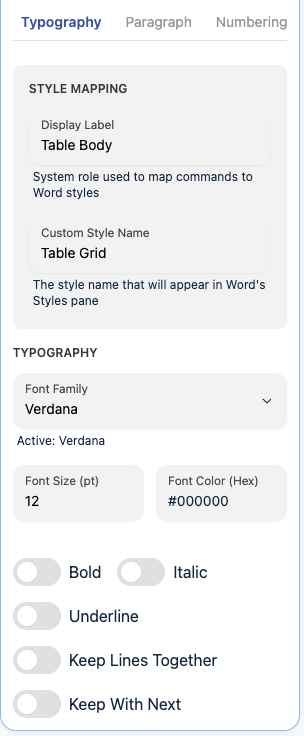
Typography Settings
Click the Typography tab in the Style Editor to configure:
Custom Style Name
-
The name that appears in Word’s Styles pane
-
Example: “My Company Heading 1”
Font Family
-
Choose from available fonts: Times New Roman, Arial, Calibri, etc.
-
Leave empty to use the global font setting
Font Size
-
Set size in points (pt)
-
Range: 6pt to 72pt
Font Color
- Enter a hex color code (e.g., #000000 for black, #1E3A8A for dark blue)
Text Formatting Toggles
-
Bold - Make text bold
-
Italic - Make text italic
-
Underline - Add underline
Paragraph Control Toggles
-
Keep Lines Together - Prevents paragraph from splitting across pages
-
Keep With Next - Keeps paragraph on same page as the next one
Paragraph Settings
Click the Paragraph tab to configure spacing and indentation:
Space Before
-
Space above the paragraph in points
-
Example: 12pt adds space before each paragraph using this style
Space After
-
Space below the paragraph in points
-
Example: 6pt adds space after each paragraph
Left Indent
-
How far the paragraph is indented from the left margin
-
Positive values indent inward, negative values extend outward
Hanging Indent
-
Used for numbered lists and definitions
-
The first line starts at one position, subsequent lines indent further
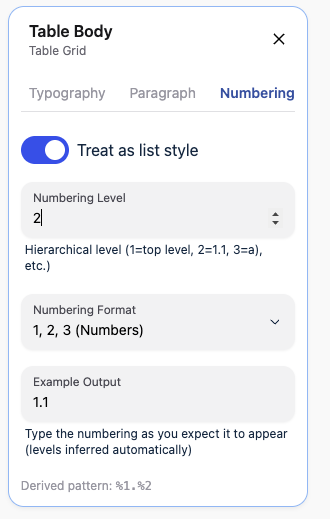
Numbering Settings
Click the Numbering tab for list and numbering styles:
Treat as List Style
-
Toggle ON to enable numbering options
-
Required for numbered lists, bullet lists, and heading numbering
Numbering Level
-
Sets the hierarchy level (1 = top level, 2 = sub-level, etc.)
-
Level 1: 1, 2, 3…
-
Level 2: 1.1, 1.2, 1.3…
-
Level 3: a, b, c…
Numbering Format
Choose from:
-
Decimal - 1, 2, 3
-
Lowercase Letters - a, b, c
-
Uppercase Letters - A, B, C
-
Lowercase Roman - i, ii, iii
-
Uppercase Roman - I, II, III
-
Bullet - •
Example Output
-
Type how you want the numbering to appear
-
Example: Type “1.1.1)” to create a multi-level format like “1.1.1)”
-
The system automatically builds the pattern from your example
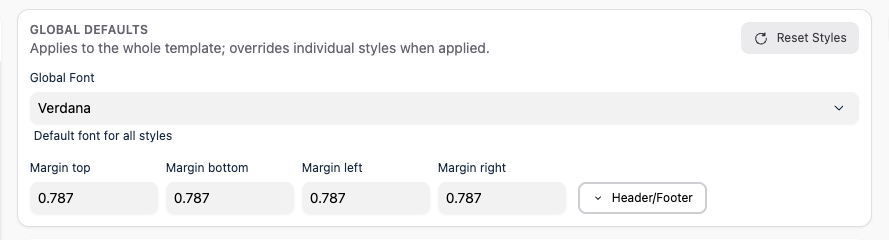
Global Settings
Above the preview panel, you’ll find global settings that apply to the entire template:
Global Font
-
Sets the default font for all styles that don’t specify their own font
-
Changing this updates all styles using the default
Page Margins
-
Set margins in inches for: Top, Bottom, Left, Right
-
These define the printable area of your documents
Adding Custom Styles
Need a style that doesn’t exist in the base template?
-
Click Add Custom Style at the bottom of the Style List
-
Give your style a name
-
Configure its typography, paragraph, and numbering settings
-
The new style becomes available in your template
Custom styles are marked with a “Custom” indicator in the list.
Deleting Custom Styles
To remove a custom style you created:
-
Find it in the Style List
-
Click the delete icon next to the style name
-
Confirm deletion
Note: You cannot delete built-in styles from the base template.
Commands Configuration
When creating a custom template in the Template Editor, you configure which formatting operations and quality checks are included. Click the Commands tab to access these settings.
Template Commands
Toggle each formatting command on or off:
| Command | What it does |
|---|---|
| Headings | Identifies and formats heading paragraphs with the correct heading level styles. |
| Lists and Numbering | Formats list items and numbered paragraphs with proper numbering hierarchy. |
| Definitions | Formats defined terms and their descriptions with definition styles. |
| List Punctuation | Standardises punctuation at the end of list items for consistency. |
| Signatures | Formats signature blocks with the appropriate signature styles. |
| Paragraph Text | Applies body text styles to remaining paragraphs. |
Template Requirements
Toggle individual document structure checks:
| Requirement | What it checks |
|---|---|
| Document Header | Whether the document has a header. |
| Document Footer | Whether the document has a footer. |
| Page Numbers | Whether page numbers are present. |
| Watermark | Whether a watermark is applied. |
| Table of Contents | Whether a table of contents exists. |
| Definitions | Whether a definitions section is present. |
| White Spaces | Whether extra white space has been removed. |
Final Draft Checks
Toggle individual quality checks (available to users on Monthly and Annual plans):
| Check | What it finds |
|---|---|
| Placeholder Text | Text that looks like it should be replaced with real content. |
| Footnotes | Footnotes that may be incomplete or empty. |
| Cross References | Cross references that may be broken or invalid. |
| Text Format Inconsistent | Paragraphs whose formatting does not match the template style. |
| Highlighted Text | Text with highlighting still applied. |
| Definitions Unused | Defined terms that never appear in the body text. |
Saving Your Template
Save as New Template
-
Click Save as Custom Template in the top-right
-
Enter a descriptive name for your template
-
Click Save
Your template is now available in the Word add-in.
Save Changes (Existing Template)
If editing an existing custom template:
-
Make your changes
-
Click Save Changes
-
Updates are immediately available in the add-in
Unsaved Changes Warning
If you try to leave with unsaved changes, you’ll see a warning. Make sure to save your work!
Best Practices
Naming Templates
-
Use clear, descriptive names: “Legal Brief - Standard”, “Client Report Format”
-
Include your organization name if helpful: “Acme Corp Contract Template”
Start Simple
-
Begin with the Base Template
-
Change only what you need
-
Test with a sample document before widespread use
Typography Consistency
-
Use consistent fonts across related styles
-
Set a sensible global font that works for most content
-
Reserve distinctive fonts for headings only
Spacing Guidelines
-
Body text typically uses 0-6pt space after
-
Headings often have more space before (12-18pt) and after (6-12pt)
-
Keep spacing consistent across similar elements
Numbering
-
Plan your numbering hierarchy before configuring
-
Use the Example Output field to preview your format
-
Test multi-level lists with real content
Testing
-
Save your template
-
Open the Word add-in
-
Apply your template to a sample document
-
Check all heading levels, lists, and special elements
-
Refine and resave as needed
Professional Custom Template Service
For complex requirements beyond the Template Editor:
When to Consider Professional Service
-
Need advanced automation rules
-
Require complex conditional formatting
-
Want expert design consultation
-
Have strict compliance requirements
What’s Included
-
Requirements consultation
-
Professional template design
-
Advanced command configuration
-
Testing and validation
-
Documentation
Getting Started
Visit Templates > Purchase Professional Templates or go to Template Plans for pricing and options.
Questions about creating templates? Ask in the Support category - our community can help with specific customization needs.